Lightroom Workflow - Setting Black and White Points
Lightroom Workflow - Setting Your Black and White Points 4 Easy Ways
The ‘whites’ and ‘blacks’ sliders in Lightroom CC control the very brightest and very darkest parts of your image (the two narrow ends of the histogram). In this Lightroom basics tutorial, I am going to show four different ways you can easily set the white and black point of your image using Lightroom CC.
What prompted this article is that I’ve realised that a lot of people are confused about the white and black points in a Lightroom workflow and how by adjusting the white and black sliders it can enhance your final image.
Setting Black and White Points - Hold Down the Alt or Option Keys?
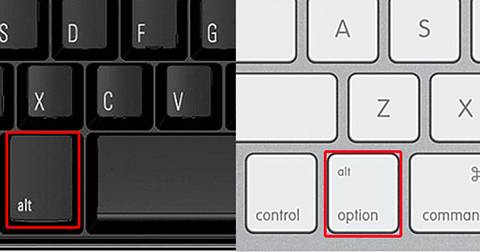
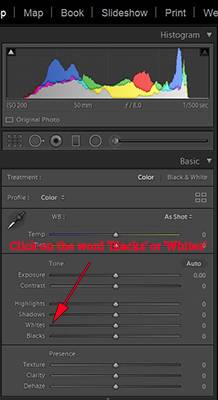
Open an image once you are in the ‘develop’ module. This first option you can use is to hold in the ‘alt’ or ‘option’ key. It’s the ‘alt’ if you have a PC or ‘option’ if you have a Mac. Now ‘click’ on the white’s slider in the basic’s panel on the right-hand side. You will see the screen will turn ‘black’ the idea here is that you would move the slider to the right (still holding down the alt or option key) until you see some colours coming through.
Typically, most people when they adjust the ‘white point’ they are looking to have detail in the ‘highlights’ so what you would do is you would back off the white’s slider until all those colours have almost ‘disappeared’. This is at least technically is your ‘book perfect’ white point, now I encourage you all to move it around from there and adjust it more to your own tastes.
Similarly, you do this for the ‘blacks’ slider, you hold in that ‘alt’ or ‘option’ key and click on that black slider. This time the screen turns ‘white’ adjust the slider to the left until again almost all the colours have disappeared. Now your image will have absolute blacks (black point) and I have absolute whites (white point) and that’s the way you can adjust those sliders. So that is one way to do it. I am going to reset the sliders by just ‘double’ clicking on the name ‘whites’ and the name ‘blacks’ so they’re reset.

Setting Black and White Points - Hold Down the Shift Key
Again, with an image open in the develop module, another way to get a very quick ‘automatic’ adjustment is by holding in the ‘shift’ key and at the same time clicking on the word or the name ‘whites’ so when you ‘double click’ on it, it gives you an auto adjustment.
This is the same as if I clicked ‘auto’ up on the right-hand side of the basic’s panel. Similarly, I could do that for blacks, hold down the shift key and double click on the word blacks, this is the ‘auto’ adjustment. I often undertake to do this method if I have a lot of images to post edit, then I would adjust the whites and the blacks from this point afterwards to my liking. If I want maybe the shadows a little darker, then I would just tweak it, so I undertake the ‘shift key’ method to get me close and in the ‘ballpark’ and then I’ll adjust it from there.
Now I would add a little ‘trick’ at this point, holding in the ‘shift key’ and double-clicking on the ‘name’ you could undertake this ‘auto’ adjustment for any of the sliders in the basic panel. If you want to adjust highlights automatically hold the shift key and double click on the word highlights and you’ll get an automatic adjustment as you did with the black and white sliders. So that was the second method

Setting Black and White Points - Press the ‘J’ a Shortcut Key
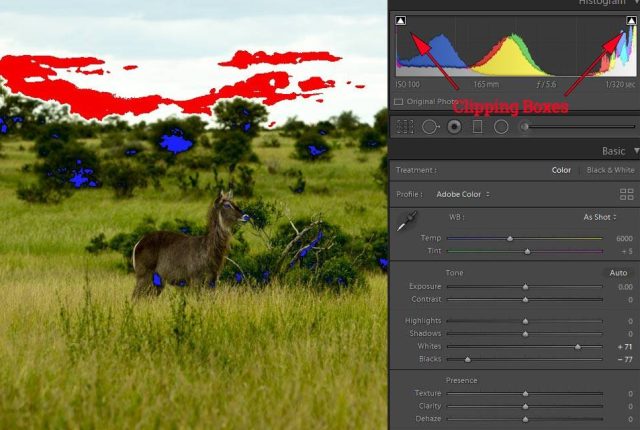
Again, with an image open and whilst in the develop module of Lightroom classic CC the third method is to press the ‘J’ key. When you press the ‘J’ key you’re turning on the clipping indicators, (the little squares at each end of the histogram at the top right of your screen.) if you are clipping (clipping means areas with no detail) some of the ‘blacks’ blue starts to come through on your image, blue indicates you’re clipping blacks.
Now if I go to the ‘black’ slider slightly and move it more to left you’ll see I’ll get more and more blue appearing, so I’m clipping more and more of the blacks.
Seeing Red
Similarly, if I go to the ‘white’s’ slider and I move that to the right eventually you’ll see red come through that means I’m clipping the ‘whites’. Most people don’t like to ‘clip’ the ‘whites’ at all, this is mainly because when you print an image if you’re clipping ‘white’ and you printed the image ‘no ink’ at all would go down on the paper wherever that ‘red’ clipping is seen. Typically, we want the printer to put some ink down on the paper, because it would look odd when the printer paper doesn’t have any ink at all in certain areas.
In this case what you would do is just pull the ‘whites’ slider down to the left until all the ‘red’ is gone. This is pretty much the same idea of holding in the ‘alt’ or ‘option’ key.
Feeling the Blues
Then with ‘blacks’, you would adjust that to your taste, you could bring the slider to the right so no ‘blue’ appears at all or you could do it so you get just a little bit of clipping, as I prefer. When you’re done with the adjustment hit the ‘J’ key again to turn those clipping boxes off.
Alternately you could turn them (clipping box’s) on and off up in the ‘histogram’ panel at the top right of your screen. Notice on the left-hand side we have a little triangle, if I hover over it, you’ll see the black’s triangle, if blue is indicated in the image the indicator comes on showing that you’re clipping those blacks.
Permanently on?
We could keep the clipping box’s permanently on by ‘clicking’ on that triangle, now it’s permanently on you could come down to move the ‘black’ slider to taste. You can turn the box back off by clicking on that triangle again.
The same thing for ‘highlights’ which is over on the right-hand side. We could ‘click’ on that ‘triangle’ to permanently turn it on or you could just hover over it to have it temporarily on, then I could move the ‘whites’ slider until I see the red in the image and adjust it from there. Then when you’re ready to turn it off again you could then ‘click’ on that triangle again. That’s the third way. Let’s reset the black and white ‘sliders’ again by double clicking on the words whites and or blacks.

Setting Black and White Points - The Histogram
The fourth and last way you can adjust the ‘white’ and ‘black’ points is to undertake it right from the Lightroom histogram (top right of your screen). A histogram provides a visual or graphical representation of the tonal values of your image. In other words, it shows the amount of tones of particular brightness found in your image ranging from black (0% brightness) to white (100% brightness).
When in the develop module, you will notice if you hover over the histogram, on the left hand side it says ‘blacks’ as you move to the right it will say ‘shadows’ if you go to the middle it will say ‘exposure’ if you go further to the right it says ‘highlights’ and if you go to the far right it says ‘whites’
.
Drag to the Right
A lot of people like to look at the histogram and see that the ‘histogram values’ go from ‘edge to edge’ or left to right, in affect from blacks (left) to white (right).
For example, in a case where the ‘whites’ aren’t going all the way to the right-hand edge, (lacking detail in the whites) you would hover over the histogram (right hand side) until it says ‘whites over in the left-hand corner of the histogram. You’ll also notice the cursor turns into this ‘horizontal’ arrow with a line through the middle it’s encouraging you to ‘click’ and drag.
Click with the left mouse button and you’ll see the horizontal arrow disappears, when you click with the left mouse button now, dragging the mouse to the right as you do it, you move the entire histogram to the right. You can also see if you look at the ‘whites’ slider below, as you drag this, you’re moving the ‘whites’ slider so you can drag that right to the edge to increase the white point to your taste.
Similarly if you wanted to increase or decrease the ‘blacks’ a little bit more or less you would simply ‘click drag’ to the left and you would just clip those a little bit more to make the blacks a little darker. So that’s another way to adjust the ‘black’ and the ‘white points.

That’s Not All
You can adjust any of these different ‘quadrants’ of the histogram in the same way. For instance, if you want to adjust ‘shadows just hover over the vertical quadrant part that is considered shadows (see a change to the words ‘shadows’ bottom left of the histogram) and then you could simply click and drag left or right to increase or decrease the shadows. When you move it, you’ll also notice that the ‘shadow’ slider moves.
Similarly, in the middle of the histogram, it says ‘exposure’ but technically if you use the universal view of what ‘exposure’ means this is actually ‘brightness’. When you adjust brightness on some applications that have a ‘brightness’ slider it’s actually adjusting the brightness of the mid-tones or the exposure of the mid-tones, so if you drag to the right you’ll make it brighter if you drag it to the left you make it darker. As you will see below this is moving the ‘exposure’ slider.
Finally, if you wanted to adjust the highlights you could go over that part of the histogram that says ‘highlights’ click with the left mouse button and drag that left or right and you’ll notice the ‘highlights’ slider is moving. This is the fourth way one can get a ‘white’ and ‘black’ point in Lightroom CC. You can as I said adjust the highlights, shadows an exposure as well if you’d like to use this method.
Similarly, if you want to get an ‘automatic’ adjustment by holding in the ‘shift’ ‘key and double-clicking on a ‘name’ you could do that for many of these sliders in the basic panel. It won’t work for ‘texture’, double-clicking just ‘resets’ that slider back to ‘0’. It will, however, work for ‘vibrance’ if you hold the ‘shift’ key in and double click on the word ‘vibrance’ you can see it gives you an ‘automatic’ adjustment there and saturation the same. Now you can see you could get ‘automatic’ adjustments on any one of the sliders that are affected when you click ‘Auto’ by holding in the ‘shift ‘key and double-clicking on the name of the slider.
So that’s four different ways you could get easy white and black points in any image in Lightroom.
Setting Black and White Points - Conclusion
Whichever method you prefer to get you to your correct black and white points in Lightroom CC treat it as the beginning of the process, not the end. As you improve as a photographer and you post-editing also improves, try to be more creative in your approach to your images. By adjusting the sliders in the basic panel beyond the norm, you will be amazed at what you can create.
- African Wildlife Photography Tips - February 23, 2020
- Low Light Wildlife Photography - November 26, 2019
- Bonamanzi Game Reserve - November 21, 2019

