How to Delete Rejected Photos in Lightroom
Easily Reject and Delete Photographs in Lightroom
I have just returned from a recent photo shoot with hundreds of photographs, which I have just uploaded to my computer. Using Lightroom CC, I thought it would be a good idea just to let you all know of my preferred method of quickly culling photos in Lightroom that are not wanted ie. those that are out of focus, badly under or over exposed etc…
Different Ways to Delete Multiple Photos in Lightroom
There are always several methods to reach an end goal in most things we do. How to delete rejected photos in Lightroom is no exception. When it comes to identifying and culling photos in Lightroom, we need a quick delete and reject workflow.
I shall just mention three of the most popular methods here along with my preferred method, on how to delete rejected photos in Lightroom. However, the purpose of this post is not to go through each alternative or how you can in practice fully implement these in your Lightroom workflow, more a broad but informative overview.
The three most popular methods of how to delete rejected photos in Lightroom CC are coloured labels, star ratings and flags (my preferred method)
Colour Labels
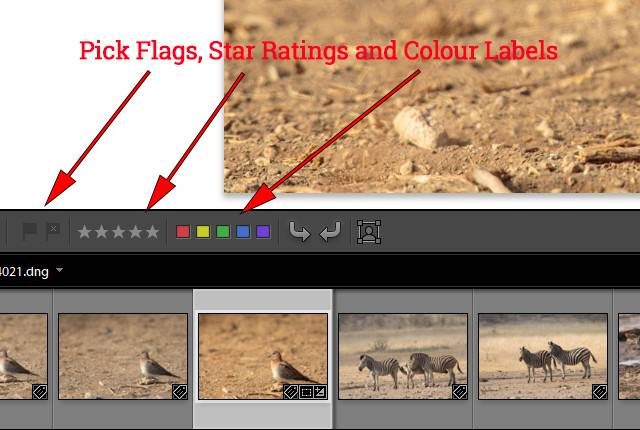
How to delete all rejected photos in Lightroom cc? One of the popular methods has to be the option to create ‘coloured labels’ that can be attached to your photos. In-fact five different coloured labels.
In the library module after your photos are imported simply ‘right click’ on a photo and a drop-down menu will appear and give you an option to ‘set colour label’. Then you can choose to attach a colour to that photo or colours of your choosing to each and every photo you have imported.
Alternatively, colour labels can be set once you have highlighted a photo or photos by clicking one or of the five ‘coloured labels’ in the ‘taskbar’ which runs along the bottom of the ‘grid view’ in the library module.
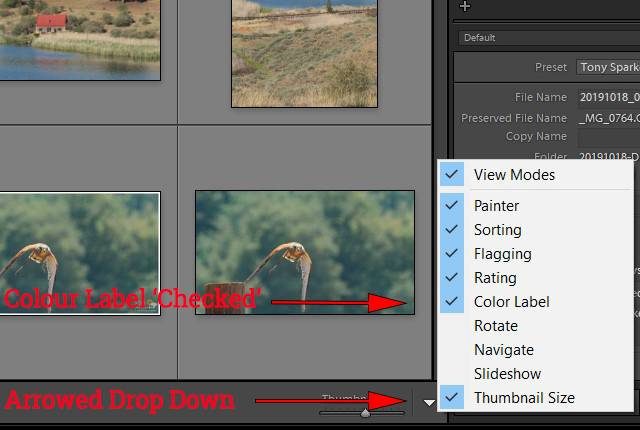
If these ‘colour labels’ are not visible to you, simply go to the ‘arrowed’ dropdown menu to the bottom right of the ‘grid’ view in the ‘library’ module and check mark ‘coloured label’ to see them appear in the taskbar.
As an example, you could attach the ‘red’ colour label to all the photographs you want to remove. Once the labels have been attached and the task is complete, simply highlight all the photos with a red label and or filter them, highlight them, and or ‘right click’ on them individually and press ‘remove photo’. You will see all the red labelled photo’s will then be removed from your Lightroom library and catalogue.
Star Rating
As an alternative to ‘coloured labels’ one can use the ‘star rating’ system. This method is applied in the same way as the ‘coloured labels’ but instead of ‘colours’ to rate or identify photos you give them a ‘star’ rating between 1 and 5.
Follow the same instructions for ‘coloured labels above but you can substitute colour labels for a star rating. Again, if the ‘star rating’ is not showing on the taskbar, simply follow the procedure for ‘colour labels’ and they will appear on the taskbar.
Speed Up Your Lightroom Workflow
The methods above work well, but if you want to speed up your workflow significantly then follow my preferred method and the method I use myself for initially removing or ‘culling’ of my photo’s quickly after the initial importing of photo’s into Lightroom.
Auto Advance
Before we move to my preferred method, we need to ensure one more step is activated, ‘auto advance’. I use ‘auto’ advance to speed up my ‘culling’ work while sorting through my photos to decide which ones are ‘keepers’ and which ones are rejected/culled and/or to identify my favourites
Set Auto Advance
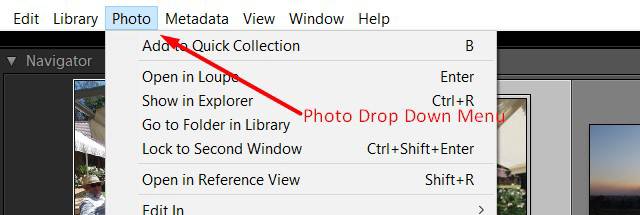
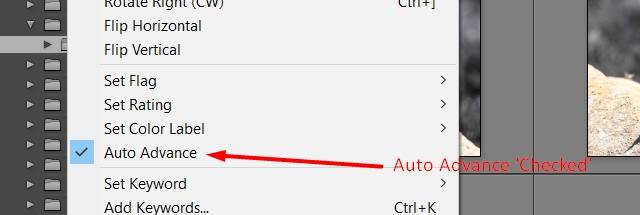
To set ‘auto advance’ ensure that you are in the ‘Library’ module, go to the ‘loupe’ view, we can turn on ‘auto advance ‘from there. There are two options, first and my preferred option is to go to ‘photo, a drop down will appear you will see ‘auto advance’ make sure it’s checked.
Keyboard Option
Another option to turn on ‘Auto Advance’ is to use the ‘caps lock’ key on your keyboard when in Lightroom. Some people like this option for two reasons, one because you can look down at your keyboard and you can see that ‘auto advance’ is on. Otherwise there’s no indication in Lightroom that ‘auto-advance’ is even turned on.
Secondly, some people always like to keep their hands on the keyboard to speed up their work while they are culling. For example, with ‘auto advance’ on, one can simply type ‘P’ to assign a ‘pick’ flag to an image for example.
Flags
So, with auto advance now set in Lightroom CC, the use of ‘flags’ is my preferred quick method to identify the photos to be ‘culled’ during the initial sorting stage after photo import. For our culling purpose, ‘flags’ designate whether a photo is a pick (keep) or rejected , (cull).
Flags can also be set while in the Library module. Highlight a photograph, go to ‘photo’ and the dropdown will appear, go to ‘set flag’ and choose either ‘flagged’ or ‘rejected’. Now this is where the ‘auto advance we set earlier comes into its own.
As you decide what ‘flag’ you want to use for your photograph, ‘flagged’ (keep) or rejected (cull), once decided Lightroom will automatically advance to the next photograph which is a great benefit when you have hundreds of images. This can be repeated until you reach the end of all your photographs.
Quicker Option
While the above option is quick and the keyboard option is preferred by some, I prefer to use the mouse method to select the ‘flag’ to be used.
This is simply done by going to the bottom right hand side of the ‘grid view’ in the library module. As described above you will see a small white arrow. Click this and you will see a ‘pop up’ appear, ensure that ‘flagging’ is checked. Once checked, you will now see the ‘pick’ or ‘rejected’ flags appear on the taskbar below the grid view in the Library module.
Now, simply start at the beginning of your photos you have just imported, click on the first one and decide which flag you want by simply clicking with the mouse on a flag. Once clicked, Lightroom will advance to the next photograph and so on and so forth all the way to the end.
Once all you photos are flagged, you can ‘click’ a ‘flag filter’ button in the Filmstrip or in the Library Filter bar to display all the ‘rejected’ flags, highlight them all, right click and press ‘remove photo’, all your rejected photos will be removed from your files and catalogue.
Flags, Colour Labels and Star Ratings
Auto advance will also work when assigning other information as well. For example, flags, star rating and colour labels.
If you like keeping your hands on the keyboard, use keyboard shortcuts to assign your information. For example, P assigns the pick flag, X the reject flag, not R that would take you into the ‘crop tool’ in the develop module.
Numbers 1 through to 5 for stars ratings, 6 for the red colour label 7 (yellow) 8 (green) & 9 (blue) there’s no keyboard shortcut for purple, so if you type for example P for pick again, you go to the next image with ‘auto advance’ on.
All the above can also be done with the click of a mouse if the colour labels, star ratings and flags are visible on the taskbar as described previously.
Favourites - Assign Flags and Star Ratings to the Same Image
If you would like to assign say a ‘pick flag’ and two stars to the same image, then what? Normally, if you assign just the ‘pick flag’ using Lightroom, Lightroom is going to jump to the next image with ‘auto advance’ turned on.
Therefore, to assign the first piece of information, a ‘pick’ flag, hold the ‘shift key’ down as you type ‘P’ this temporarily disables ‘auto advance’ and tells Lightroom to hold for a second. Now, if you take your finger off the ‘shift key’ and type two (2) for ‘two stars’ it advances to the next image. This operation can also be undertaken using the mouse. Hold the shift key as before, clicking the ‘pick flag’ release the shift key and click the 2 ‘star ratings’ shown on the task bar. You will then see Lightroom ‘auto advance’ to the next image leaving a pick flag and a 2-star rating on the previous image irrespective of which method used.
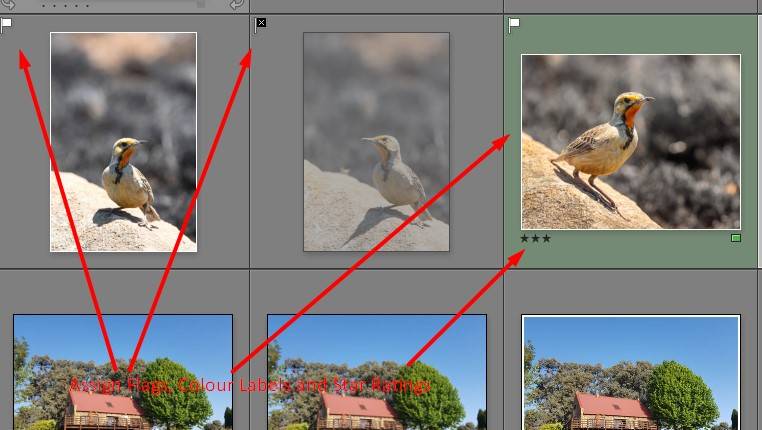
Assign Flags, Colour Labels and Star Ratings
Now let’s say that I want to assign a ‘pick flag’, stars, and the colour label (red) all on one image. Go to the image, simply hold the ‘shift key’ down, type P for ‘pick’, two (2) for two stars, keeping your finger on the ‘shift key’ this time. Then with your finger off the ‘shift key’ you can type that last piece of information which is six (6) for red. You will see Lightroom auto advances to the next image with all the information assigned as you stated to the previous image.
If you don’t want to remember the keyboard shortcuts and many don’t, you can ‘click’ with the mouse on the flag, colour label and star rating icons as described previously on the taskbar.
Turn Auto Advance Off
While you’re using ‘Auto advance’ in the Library module, but want to turn ‘Auto advance’ OFF simply go back up to ‘photo’ in the top task bar, click and un-check ‘Auto advance’ to turn it off, or you can also hit the caps lock key on your keyboard to turn it off.
Conclusion
That’s it for using ‘Auto advance’ a very handy feature to quickly ‘cull’ those initial images after returning from a shoot. Even after initial culling, assigning colour labels, star ratings to favourites and for those images you want to keep can be quick and easy.
- African Wildlife Photography Tips - February 23, 2020
- Low Light Wildlife Photography - November 26, 2019
- Bonamanzi Game Reserve - November 21, 2019

