Exposure Triangle Explained
The exposure triangle is probably the primary fundamental to be mastered and understood and to ensure a solid basis for any photographer in any genre of photography.

What is the meaning of each component and what does it do?
Aperture:
This component of the exposure triangle refers to the size of the hole (or opening) in your lens as you press the shutter button and take a picture. The aperture “controls the depth of field” (amount of sharpness) in your photograph. The larger the hole (or aperture), more light passes through that hole to hit the camera’s sensor with less DOF. Alternatively the smaller the hole (or aperture) less light passes through that hole to hit the camera’s sensor with more DOF. When discussing aperture it is typically expressed in “F” numbers, for example; F/2.8, F/4.0, F/5.6, F/8.0. F/11.0. F/16.0 (dependant on your lens capabilities).
Unfortunately, with modern lenses, F numbers are not marked on the lenses themselves but only visible when a lens is attached to a camera (DSLR) and then viewed through the viewfinder. Try it now, switch the camera over to manual (M) or aperture priority mode (AV) typically on a Canon camera, for example, and adjust your camera’s aperture dial (refer to your camera’s handbook for this) up or down and watch the F-number change in the camera’s viewfinder. You are now changing the aperture, a component of the exposure triangle.
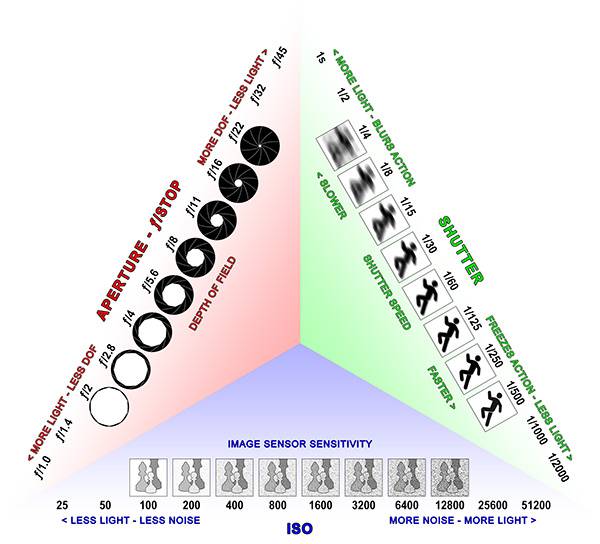
Refer to the Aperture portion of the infographic for a more visual representation of what is described above.
ISO:
Another component of the exposure triangle is ISO. In the film days, photographers use to refer to the sensitivity of the film to available. This sensitivity was based on an ASA numbering system. Therefore 100ASA film was less sensitive to light than say 400ASA film. However, there were drawbacks as higher ASA numbered film produced ‘grain’ in photographers finished photographs with the higher number producing more grain.
In today’s digital age, ASA has been replaced with the term ISO and grain has been replaced with the term noise. As we no longer use film (although some still do) our camera’s sensor captures the information once the lens aperture is opened, instead of the film. The sensitivity to light of the sensor can be adjusted by increasing (more sensitive to light) or decreasing (less sensitive to light) by adjusting the ISO. With a lower number, for example, 100 (ISO) you will have less sensitivity to light. With a higher number, for example, 1000 you will have more sensitivity to light.
It is important to remember, as with film, that higher numbers can cause grain (film days) or noise ( digital age) in your image. It is generally best to try and keep your ISO as low as you can to avoid digital noise in your images, however, sometimes noise as with grain can be used to creative effect.
Refer to the ISO portion of the infographic for a more visual representation of what is described above.
Shutter Speed:
The final part of the exposure triangle is shutter speed. In short and simply put, a camera’s shutter speed controls how long your camera’s shutter stays open once you fully depress your shutter button on your camera. In other words, we can control how much light comes through to the camera’s sensor based on how long the shutter is open for. The longer the shutter is open, the more light will hit the sensor, equally, the converse is also true. Shutter speed also controls motion, so if you want to freeze motion you will need to have a faster shutter speed. If you wanted to get movement in your image (sometimes known as motion blur) you will have a slower shutter speed. Shutter speeds are expressed in a fraction of a second 1/15 (1/15th of a second), 1/30, 1/60, 1/125.
Refer to the Shutter Speed portion of the infographic for a more visual representation of what is described above.
Shutter Speed Example
Probably one of the best examples of how the exposure triangle works is to adjust a camera’s shutter speed, as the shutter speed is one of the components of the exposure triangle. Many landscape photographers like to ‘slow down’ the movement of running water or clouds within their scene and get a little creative.
Using different shutter speeds allows the photographer to add interesting detail showing dynamic movement in a still frame picture. By ‘slowing down’ the shutter speed it means the lens opening (aperture) is open longer than it would normally be if the photographer was to take a normally exposed photograph where the water element of the scene was perhaps frozen in time.
This provides a nice silky smooth water flow or ‘motion blur’ as its normally called. To ensure you create the effect you want it often requires a little ‘experimentation’ until you are comfortable with your skill level.
In the sample to the right and consider the other components (Aperture & ISO) constant over both photographs, I have adjusted the shutter speed to provide the creation of movement or motion in the portion of the photographs shown. When you slide to no ‘motion blur’ this was photographed at a shutter speed of 1/40th sec, to slow down the water motion considerably and get the effect I wanted I used an ND filter to allow me to keep the shutter open for a whopping 54sec and get that long silky water effect over the stones.


The slide down image, photographed is at 1/40 second shutter speed, shows no motion blur. The water looks pretty natural and as it would to your eye. The slide up image was photographed at 54secs and provides that smooth silky motion blur.
Exposure Explained – They all Work Together
One soon comes to realise that certain numbers have a pattern and this is for a reason. Take aperture, for example, a typical range would be f/1.4, f/2.8, f/4, f/5.6, f/8, f/16 and f/22. The numbers almost double every time. For the ones that don’t (f/4 and f/22), they are usually the previous two numbers added together (roughly). ISO is similar where the numbers double each time. 100 goes to 200, then 400, 800, 1600, 3200 and so on dependant on your camera. Shutter speed follows suit with 1/125, 1/250, 1/500, 1/1000 up to around 1/8000. Each of these numbers is one stop. They either add or subtract one stops worth of light from your image. The reason we show them in a triangle is that they all work together.
For example, you have a correct lighting scene at ISO 100, shutter speed at 1/125 and an aperture of f/16. But what happens when the sun disappears behind a cloud? The scene just got two stops darker. This means you need to add two more stops of light to your settings for correct exposure. You could add it using ISO, changing it from 100 to 400 (100 -> 200 -> 400). This, however, could compromise the resolution and quality of your image. As discussed above a higher ISO brings digital noise.
Your shutter speed could change two stops from 1/125 to 1/30 (1/125 -> 1/60 -> 1/30). In doing this, you will have a high level of camera shake in your image. so not really a good idea without compromising the image.
In this case, we would change the aperture from f/16 to f/8 (f/16 -> f/11 -> f/8). Letting in more light by opening the aperture.
The Exposure Triangle in Conclusion
The exposure triangle is a daunting theory for any new photographer to grasp, but continually shooting and experimenting is the only way to learn them and their value. If you have live view on your camera I would definitely recommend using it. Live view is a very powerful tool to help you see what you are actually taking, use the histograms and display them on screen.
Live View allows you to see, real time, how the changes in camera settings affect the exposure and histogram. This is a great learning tool!
- Live View also allows you to see your composition, framed as it would be hanging on the wall, instead of the fully immersive experience that comes from looking through a viewfinder.
- I find live view helps to improve image quality as well as your composition.
- Take lots of images and try and understand how you arrived at the image you have
- Challenge yourself to change settings and try to predict the results it will produce.
- Have a clear picture of the image you want to produce, adjust your settings to produce that mental picture
Using all the above techniques, trying to see how all 3 components rely on each other, the exposure triangle will become second nature.
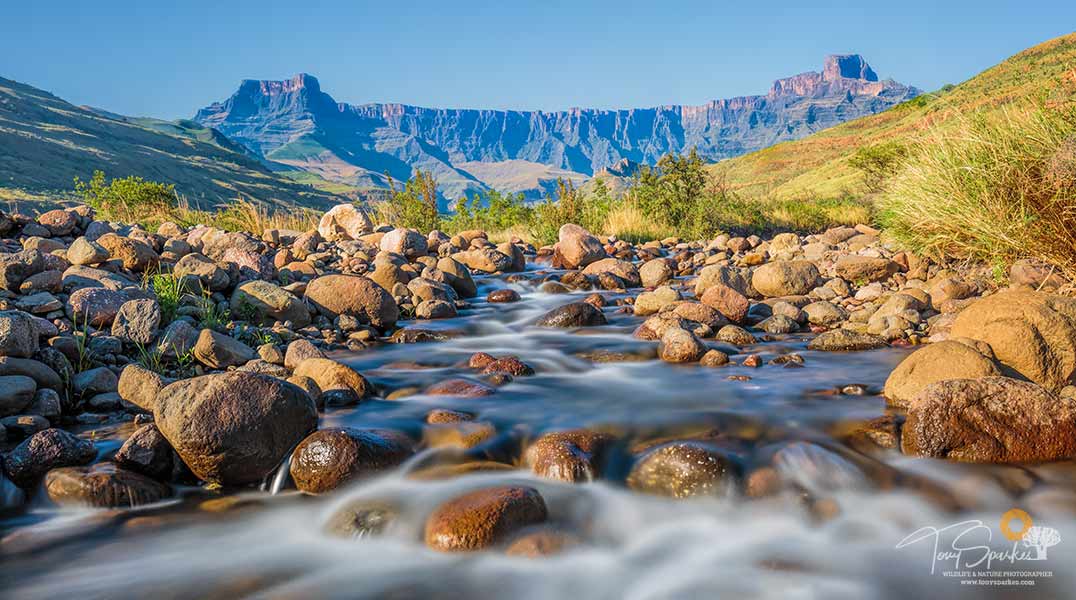
Finally, the main photograph captured in South Africa at the Royal Natal National Park while on one of my photo tours, demonstrates how ‘motion blur’ can sometimes enhance a photograph. If you are interested in wildlife or photo safari’s or one of our other tours please contact us.
- African Wildlife Photography Tips - February 23, 2020
- Low Light Wildlife Photography - November 26, 2019
- Bonamanzi Game Reserve - November 21, 2019

