Lightroom Workflow
This Lightroom workflow is a beginners guide to Adobe Lightroom Classic (2019)
Just to kick off this Lightroom workflow tutorial, it should be noted Adobe Lightroom is no longer the single program that it once was and is no longer a stand-alone piece of software. Since 2013 Adobe has made the Adobe Creative Cloud Membership subscription based (you pay a monthly subscription instead of a one-off payment for stand-alone software with periodic updates).
As easily as choosing between black and white, photographers can now access the cloud-based Lightroom CC and the original Lightroom stand-alone desktop version, now called Lightroom Classic CC in one package. It’s easy and relatively cost-effective, at only $9.99 per month to get Lightroom as part of the Creative Cloud Photography plan which, as mentioned above, comes under subscription from Adobe.
With a couple of major advantages, the Creative Cloud Photography Plan comes packaged with the industries leading editing software; Adobe Photoshop, as well as 20gb of cloud storage. Lightroom CC does not come with Adobe Photoshop but has 1TB of cloud storage. Of course, LR Classic is always regularly updated (as is Lightroom CC) when new updates become available.
Lightroom CC was redesigned to create a seamless workflow for photographers regardless of the device you’re using. This is carried out by storing all of your photos, including your RAW files, on a cloud-based server. In comparison, Lightroom Classic CC maintains all of the photo-editing power meant for your desktop system with all your files being stored locally on your computer. The programs are different, although some share common features, however, enough differences remain between Lightroom CC and Lightroom Classic, that one may be better suited for your own personal workflow.
You can also check out these additional Lightroom Classic CC workflow Tips and Tutorials from Tony Sparkes:
- Lightroom Classic CC: Compare Photo’s Side By Side
- Lightroom Classic CC: Setting Black and White Points
- Lightroom Classic CC: How to Read and Image Histogram
Lightroom workflow made simple
Adobe Lightroom along with Adobe Photoshop are the giants of the photography software landscape, with enough functions and processes to make any photographer want to complete a degree in ‘applied physics’ rather than learn and use the menus and sliders of these two pieces of software. At Lightrooms simplest and most basic level though, any Lightroom workflow is created to help you do three main things; sort your photographs, post-process them and export them.
Clearly, a sound Lightroom workflow is an important process for any photographer to learn, whether you are just starting out or you are an advanced photographer wanting to use Lightroom as your photo management and manipulation software choice.
This Lightroom Classic CC workflow guide is aimed at beginners. I will go over the basic Lightroom workflow process from start to finish for ‘setting up’, ‘creating’ and ‘importing’ your images into a ‘Lightroom Classic CC Catalogue’. It also covers the creation of a sound ‘folder’ and ‘file’ structure. It’s a Lightroom workflow process I use each and every day.
Lightroom Workflow – Importing into Classic CC
Okay, you have taken fifty, maybe hundreds, if not thousands of images, now you need to find software that provides a flexible cohesive workflow to import, organise and identify your best photographs. You will also need to delete, edit, keyword and maybe even deliver photographs to a printer, friends and colleagues, possible clients, and of course these days your social media platforms e.g. Facebook, Twitter and Instagram. Let’s look at Lightroom Classic 2019 for this process.
This Lightroom workflow ‘checklist’ for ‘Importing’ your images will start you off in the right direction to achieve these goals. Let me explain a step by step workflow and some best practices for importing your images into Lightroom Classic CC.
File Location
First though a quick word on the organising and storage of your images. Your folder/file structure is also very important. If you haven’t already created a solid way of accessing your photographs you will need to start off on the ‘right foot’ and create a good yet simple ‘file structure’.
Below is how I structure my folders and files, this works for me but you may want to work differently as there are many ways of structuring a folder/file system. Whichever way you want to structure it, you need to have a solid file structure to start with. I reiterate, there is no right or wrong way to do this, just a sound consistent principle that should always be followed once set up.
I store all my images on my desktop computer on a partitioned drive (D:). This provides me with quick access to all my photographic images. I also have an exact copy of my D: drive on an ‘external’ hard drive permanently attached to my computer. This external drive is synced in real-time to my desktop computer’s ‘D’ drive.
For syncing my images I use a very robust and easy to use piece of software called GoodSync. When I add or delete images to my desktop computer the images are added or deleted on the external drive, synced via GoodSync.
In addition to these two drive copies, my desktop D: drive is also synced to a cloud-based back-up facility called I-drive, the system is great value for money, really simple and easy to use. Your files and folders can be synced in real-time or at predetermined times when you are not online working.As storage is reasonably cheap these days, this all makes for a very cost-effective way of making sure your images stay safe in case of any major problems, for example, hard drive failure, theft, corrupt files etc. You will be sure to have peace of mind, in that you will always have a copy of your original images somewhere, saving you a lot of heartaches when things inevitably go wrong at some point. This array of backups may seem excessive but it provides me with a 100% secure, image backup solution.
Folders and File Structure
These next steps assume you have paid your Adobe subscription, downloaded your Lightroom Classic CC software and opened it up on your computer.
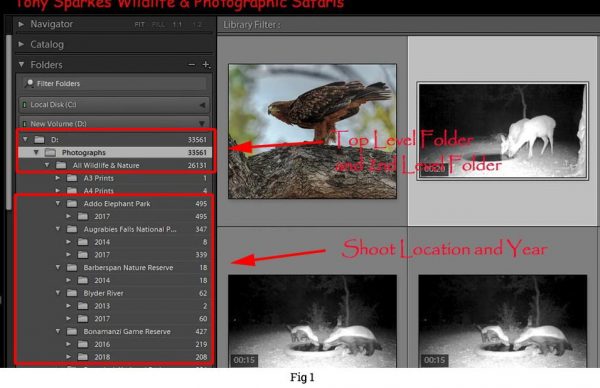
My structure: On my D: drive (partitioned) on my desktop computer I have created a top-level folder called “Photographs”. This is where I store all of my pictures from my phone, holidays, personal and professional work from my tours and safaris.
On your computers hard drive, you can now proceed and create your first top-level folder i.e. ‘Photographs’ or (YOUR OWN NAME). Once you have created your top level folder, then in ‘Lightroom’ you need to ‘Synchronise’ your Top Level Folder (i.e. Photographs or YOUR OWN NAME) with Lightroom itself.
You can do this by simply going to the left-hand side, under the drive letter where you created your folder. Right click on your drive letter and choose ‘Synchronise Folder’. The window ‘Synchronise Folder’ will appear, simply press the button ‘Synchronise.’ Lightroom will then ‘Synchronise’ all the folders you have created, in this case just the one, ‘Photographs’ or YOUR OWN NAME will appear on the left-hand side.
Second Level Folders, Locations and Years
I have created a 2nd level folder in Lightroom by right-clicking on ‘Photographs’ (or YOUR TOP LEVEL FOLDER) and clicking on ‘Create Folder Inside’ the TOP LEVEL FOLDER ‘NAME’). My 2nd level is called ‘All Wildlife and Nature’ and sits below ‘Photographs’. This is my main professional photography folder under the my main ‘Photographs’ folder. Please create your own 2nd level folder in Lightroom as required now as described above.
Under my ‘All Wildlife and Nature’ folder, I have again created in Lightroom several ‘Shoot Location’ folders by clicking on the folder these ‘Shoot Location’ folders sit below (in my case All Wildlife and Nature) following the same procedures as above. These ‘Shoot Locations’ are where I have photographed over the years. Under each ‘Shoot Location’ in Lightroom, I create a year, as I may return to the same location in different years. You can proceed to create through Lightroom your 2nd, 3rd and 4th level folders as described above. Why do I create these folders ? now this will become clearer when reading the ‘Destinations’ section at the end.
Your Lightroom Classic CC desktop apps left-hand side folder layout should now look something like Fig 1. with a Top Level folder, 2nd Level, Location and Year.
Folder Structure
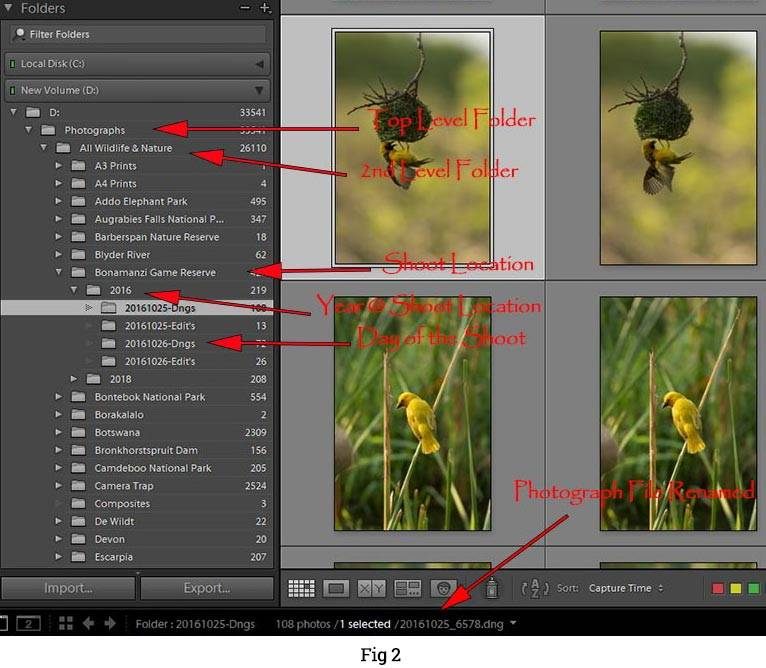
This is what I use, but feel free to create what you are most comfortable with and that works best for you. Again though the key is ‘consistency’ in everything you do with any Lightroom workflow.
(My Folder Structure) : Photographs/Wildlife and Nature/KrugerPark/2019.
Photographs – (Top folder level)
Wildlife and Nature – (2nd Level Folder under Top Level Folder)
KrugerPark – (Shoot Location Under 2nd Level Folder)
2019 – (Year of the Shoot, under the Shoot Location)
20190502 – (Day of the shoot, under the Year of the Shoot)
20190502_xxxx.dng (Photographs File on the Day of the Shoot)
The file above is renamed 20190502_xxxx.dng, from xxxx.dng during importing into the Lightroom catalogue to include the day of the shoot, but the camera image sequence number from 0001-9999 remains the same. (See Fig 2) Also, see the ‘File Renaming’ section below.
Catalogue – Lightroom Classic CC
The first step once you have defined and created your initial file structure in this Lightroom workflow, it is to create a Lightroom catalogue. Your catalogue is a great way to keep your images organised and you need at least one catalogue for Lightroom to work. All the information regarding your images is stored in the catalogue file, this file should be ‘backed up’ as I have recommended above.
Name Your New Catalogue
Start off with your new Lightroom catalogue by going to File > New Catalogue. Name it accordingly; mine is simply Lightroom CC.lrcat (lrcat is the catalogue file extension). I keep this file on my main desktop on ‘C’ drive for performance reasons, with a copy to my external hard drive and also a copy goes up to to the ‘cloud’ (Idrive). Ensure that the catalogue is in a safe place; as when you edit photos, add keywords to them, or do other things to images in Lightroom, all these changes are stored in the catalogue.
Lightroom Workflow – Preferences
I personally use only one catalogue which has thousands of photograph’s information stored in it. Others prefer to create separate catalogues per year i.e. one for each year and use them accordingly; the choice is yours. If you choose to go down this route of multiple catalogues then you will need to modify the ‘default
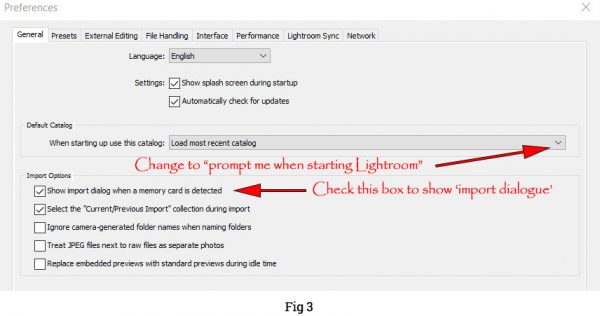
By making this change, Lightroom prompts you and asks which catalogue you would like to load when you start up Lightroom. To do this simply go to File > 2019 Catalogue (or whatever you have named your catalogues) and choose which one to open. Lightroom will open that particular catalogue and your pictures in that catalogue for you. This is convenient if you use multiple catalogues. If you only have a single catalogue, there is no need to change the default setting.
I have changed another setting in ‘preferences’ which is under the heading ‘import options’, which simply tells Lightroom to show the ‘import dialogue’ when a memory card is connected to the computer. Let’s try it then, go to Edit > Preferences and under the “General” tab, set the settings as described above based on your own preferences see Fig 3. The next tab in Preferences is ‘Presets’, here I leave everything generally as default for now.
External Editing
The next tab in Preferences is the ‘External Editing’ tab. In this tab, we can define (if you have one) the external editing file formats and colour space for such programs such as Adobe Photoshop. If you have a ‘Creative Cloud Photography Plan’ for example Adobe Photoshop will be your external editing application.
If you use RAW or DNG (not Jpeg’s) formats for your images, many photographers will complete their final image edits in Photoshop or a similar editing program. RAW and or DNG are the best formats to preserve all of your image details and with the widest possible colour space. I often transfer from Lightroom to Photoshop to finish off my editing process. Therefore my settings here in the ‘External Editing’ tab are TIFF format (default) for files and ProPhoto RGB (default) for colour space. Bit Depth should certainly be 16 bits and I have the resolution set at 300, with ‘None’ as the compression method.
File Handling
The next tab in preferences is the ‘File Handling’ Tab. As our main goal is to import our files, the ‘File Handling’ tab controls the way we import our photographs into our Lightroom catalogue.
On this tab we must pay particular attention to the ‘Import DNG Creation’ settings. I have set my own ‘File Extension’ to ‘DNG’ the ‘Compatibility’ to the latest Camera Raw version available (this can be updated through your own Creative Cloud download panel) my ‘JPEG Preview’ to ‘Medium Size’ and I have left ‘Embed Original Raw File’ unchecked.
To be able to control the total size of our DNG files, the most important settings are the ‘JPEG Preview’ and the ‘Embed Original Raw File’. The ‘Embed Original Raw File’ is something I leave unchecked because if you check it, your DNG files will actually be much larger than the original RAW file, meaning that the DNG and the RAW will be combined in a single file, which is not our goal.
‘JPEG Preview’ also helps your file size. By default, every RAW image contains a full-size JPEG image inside, that is stored as a ‘Preview’ (the ‘Preview’ image is what you see on the back of your camera when you take a photograph). By setting the ‘JPEG Preview’ option to ‘Medium Size’, you are telling Lightroom to generate a smaller version of the preview inside the DNG file, which will save you some considerable amounts of space, possibly as much as 20% per file (depending on the size of the RAW file).
That’s not a lot I hear you say, however, it does make a huge difference when you have thousands and thousands of photos. You are slightly penalised when the images open a bit slower if you try to open a full 1:1 version of a photo in Lightroom at a later stage. This is because Lightroom now has to generate a full-size version of your photo from the imported RAW/DNG image.
Just for now, leave the ‘Interface’, Performance, Lightroom Sync and Network at its default settings. I would like to mention a few things under the ‘Performance’ tab; if you have a good graphics card with an ‘onboard processor’ then you should check ‘use graphics processor’. Using a compatible graphics processor (also called a graphics card, video card, or GPU on your desktop or laptop) lets you experience better performance with Lightroom CC and Lightroom Classic CC.
In Lightroom Classic CC this will assist with speeding up the task of adjusting images in the develop module; accelerates the rendering of images in the Library module’s in Gridview, Loupe view, and Filmstrip, (windows only though) and provides a significant speed improvement on high-resolution displays, such as 4K and 5K monitors.
Smart Previews
Also, check ‘Use Smart Previews instead of Originals for Editing’. Once enabled the ‘Use Smart Previews instead of Originals for Editing’ reduces load time for your photos. This is much faster and lets you get editing faster. Lightroom Classic CC does this because a ‘Smart Preview’ is a small 2-megapixel version of your photo which Lightroom creates. As you can imagine a 2-megapixel photo will load much faster than a 30-megapixel photo would.
Catalogue Settings
Finally, before we actually import our images, we should modify your Lightroom catalogue settings.
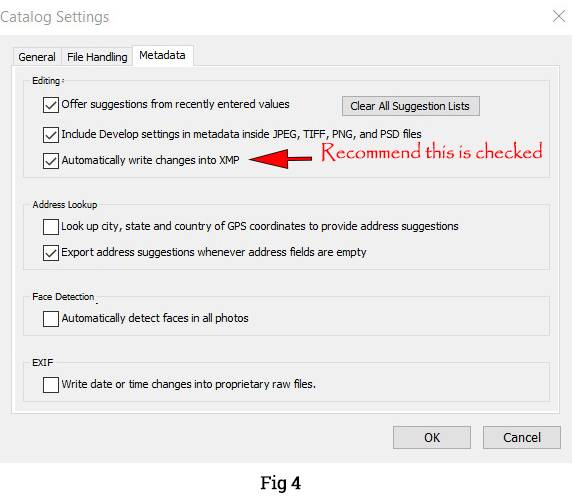
The most important tab for me here is the ‘Metadata’ tab, where I can specify what data is written into my images by Lightroom. In the ‘Editing section’ ‘Offer suggestions from recently entered values’ and ‘Include develop settings in metadata inside JPEG, TIFF, and PSD files’ are default checked and I leave them both like that.
The last option “Automatically write changes into XMP” is unchecked by default. This option I would recommend to check because it makes Lightroom write your file changes right into the DNG files (or XMP sidecar files that go with your RAW files) as you work on them. This is important because if your Lightroom catalogue failed and you lost all of your catalogue data, the image file would still keep all image changes that you’ve made in Lightroom!
It is also very useful if you happen to open that same file in Photoshop or other Adobe applications because all edit changes will be immediately visible as you work on the file in the application. Take note that checking this option provides a slower performance since every change is immediately written to the DNG/Sidecar file. If performance becomes a problem, you can turn off this setting and occasionally force Lightroom to save changes to files by selecting all files (CTRL+A in the root folder) and save changes (CTRL+S). See Fig 4
Now Import your images into Lightroom Classic CC’s Catalogue
Good news, we have set our preferences and our catalogue settings and are now ready to import our photographs. Just a quick word of warning ALWAYS import your images through Lightroom via the card/camera import option. DO NOT copy images onto your desktop directly into the folders you have created. I say this because Lightroom needs to know what you are doing; what folders are where and what files are put where. If you do ALL this through Lightroom you will not have a problem with missing files or finding files in Lightroom.
Let’s go to File> Import Photos or press CTRL+SHIFT+I on your keyboard. This will bring up the import screen it will look like mine in Fig 5.
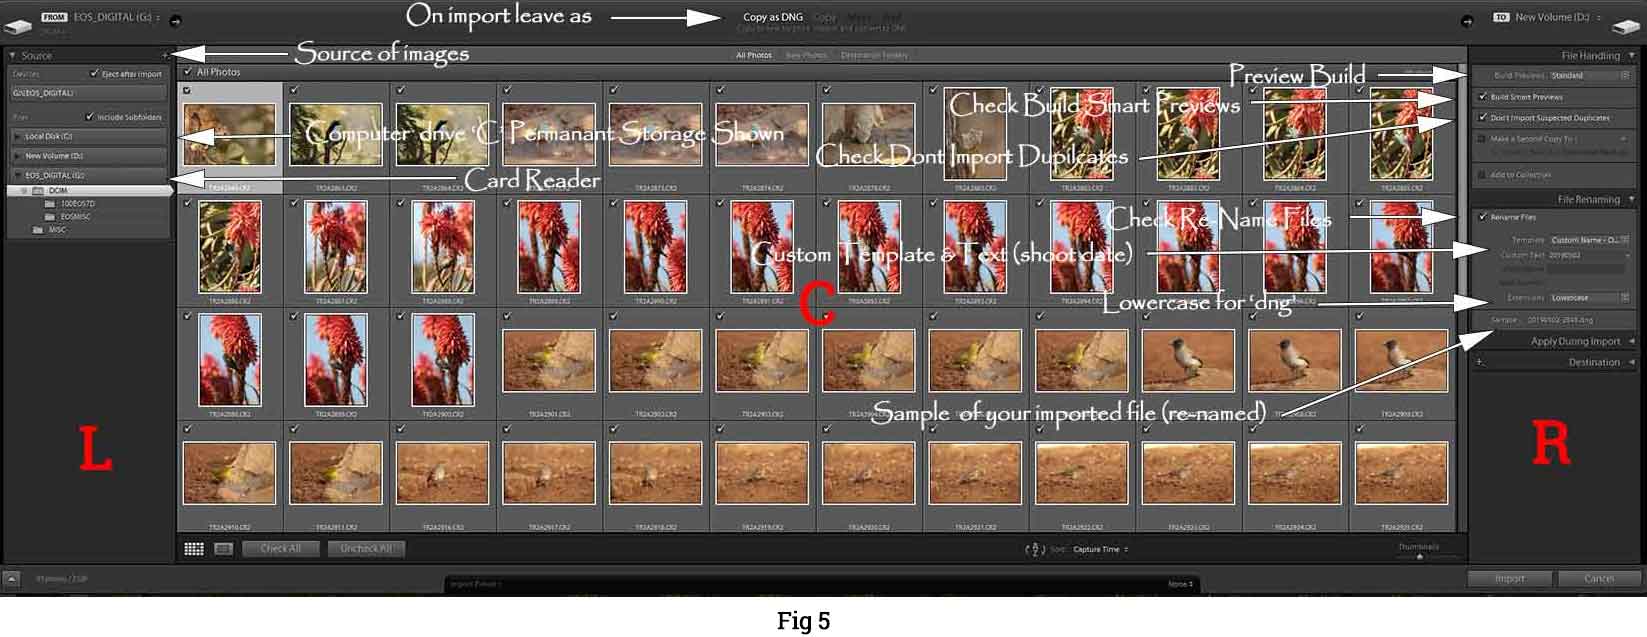
You will now note that the left-hand side or as it’s called by Lightroom the ‘Source’ section has been cleverly designed by Adobe. Lightroom is able to differentiate between your permanent storage (‘C’ drive for example) and your devices (external hard drives) or card reader/camera. This design is also dynamic, meaning that whatever changes happen on your computer system, your screen gets updated in real time. This also applies to the right-hand side section under the drop-down menu called ‘Destinations’.
To explain; if you open the ‘import’ screen and then disconnect your card reader from the computer, the device (drive letter or name) will just disappear from the screen. Reconnecting your card reader will force Lightroom to add the device back to both the left and right-hand sides of the screen. Try it now and see what happens.
RAW or DNG
As I always shoot in RAW on ‘importing’ my photographs into my Lightroom catalogue my personal file choice is the DNG format. Therefore, on import, I leave ‘Copy as DNG’ selected in the top middle section. If you prefer to copy your original RAW files, then at this point please choose ‘Copy’ instead of ‘Copy as DNG’.
You will see the right-hand side has four sections. They are File Handling, File Renaming, Apply During Import and Destination. Let’s have a look at this first, quite important, section.
File Handling – (Import Settings)
The ‘File Handling’ section consists of four parts; ‘Build Previews’, ‘Build Smart Previews’, ‘Don’t Import Suspected Duplicates’ and ‘Make a Second Copy To’. I leave the ‘Build Previews’ option on ‘Standard’ to save time during my image import. Build previews is the quality that Lightroom will show your photos when you are editing them.
Is it Faster?
If you look at the drop down menu you would think that the ‘Minimal’ option would speed up ones editing, however, there are plenty of articles online that show for some reason 1:1 is faster. I can’t explain this; only that you may encounter delays when you’re using Lightroom to preview your photos if you use the 1:1 option. But I suspect this delay is minimal and would not cause most of us a problem. If you find 1:1 previews do cause a slight delay, then switch back to a different preview mode and try again. I leave mine as ‘Standard’ as I advised above.
Next, we want to check the ‘Building Smart Previews’ as we discussed in the ‘Preferences’ section. In addition, the ‘Build Smart Previews’ option is useful for those of you that use a laptop that stores just your ‘catalogue’ with your images stored on external storage. I say this because if you travel a lot and need to disconnect from your storage, keeping this option turned on will create image previews that you will be able to work on as if you were still connected to your storage device. Once you come back home and reconnect to your external storage, all the image changes will be retained.
Next, I keep ‘Don’t Import Suspected Duplicates’ check as a precaution. If you forgot to clear your card from the session before, then those photographs would not be imported with this option checked. As previously mentioned about ‘back up’, I do not use Lightroom to back up or synchronise my imported images, so I keep the last option ‘Make a Second Copy To’ un-checked. You, of course, may choose to make a second copy to an external drive on import if you wish (see Fig 5).
File Renaming
The next drop-down menu is ‘File Renaming’ which is self-explanatory. Your camera names your photo extensions something like Date-1234.CRW, CR2, CR3 if you’re using Canon for instance. Dependant on your own camera make, you will come across other extensions like KDC (Kodak), NEF (Nikon), ORF (Olympus), PEF (Pentax), RW2 (Panasonic) and ARW, SRF, SR2 (Sony) which are some of the popular ones.
This file extension and naming makes your photos hard to search for in the future. I rename all of my original photos as described in my previous ‘File Structure’ section, for better organisation. Check ‘Rename Files’ and choose ‘Custom Name – Original File Number’ from the drop-down menu. Enter the YYYY/MM/DD of the shoot in the ‘Custom Text Field’ with ‘Extensions’ set to Lowercase from the drop-down menu, so the file extension will be dng and not DNG. (If you are following along with my file structure). You will see a sample of what your file structure will look like below the ‘Extensions’ drop-down menu (See Fig 5)
I would strongly suggest taking the same or similar approach and uniquely identify every image you import as described in my previous section. If you have followed correctly your imported files should then look something like this 20190502-xxxx.dng.
Create a Custom Renaming Template
To make renaming your image files even easier, you can create one or several renaming templates inside Adobe Lightroom. If you have not already created a ‘rename’ template, or not sure how to make one, then take a look at this great easy to follow video from Julieanne Kost below. She explains a step by step process to easily create yourself a ‘renaming’ template for when you import your files. Go ahead watch the video and try it out.
Apply During Import Section
In this Lightroom workflow tutorial, we have come across several important menus and sections. What we can ‘Apply During Import’ is no different. I personally find it one, if not the most, important section in this Lightroom Workflow process. In this section, we can apply our ‘presets’; write metadata and place our keywords into each and every image as it gets imported. Please read this section carefully and you will be sure to be able to apply and or create any of your develop ‘presets’ as well as find your images at any time in the future.
Lightroom Workflow – Develop Settings
This section lets you choose your ‘import’ develop presets with your Lightroom settings (File Handling & File Renaming). Being able to choose what general look you want for your images before the import process starts is a great bonus. Consistency is again key as you will more than likely use certain develop presets on all your photos for certain photographic genres, like wildlife, sport or weddings etc.
You will save a lot of time and shorten your post editing process with these ‘develop’ settings as it applies the develop ‘preset’ you created (or those that have come packaged with Lightroom) to your images as you import your images.
Lightroom develop presets are simply a way to make many adjustments to an image at the same time. Let’s say you find yourself making the same basic adjustments to most of your images; maybe you add a bit of contrast; recover some highlights and increase saturation. Instead of applying these three steps individually every time you edit an image, you can create a ‘develop preset’ that does them all at once.
Creating a Lightroom Develop Preset
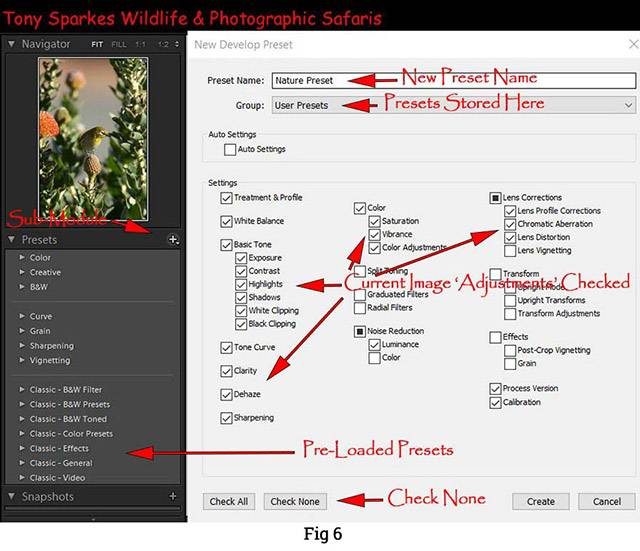
Lightroom Classic CC already comes with several preloaded ‘develop’ presets (see fig 6). It is also possible to create and save your own ‘development preset’ to suit your own individual style, should you want to. Your first step in creating a ‘develop’ preset is to make your edits, e.g. Contrast, Highlights, Vibrance, Saturation etc. to an image (once imported). When you create a ‘develop’ preset, you are basically copying those changes that you’ve made to an image and saving them within Lightroom for future use. When you’ve completed all of those edits to an image, you can go ahead and create a ‘develop preset’ that will apply those particular changes to all future images if you choose that ‘preset’.
Look across to the left pane of the ‘develop’ module, you should see the ‘Presets’ sub-module. Click on the ‘+’ sign, which will bring up the ‘New Develop Preset’ screen. (See Fig 6)
Give your ‘new preset’ a name. You’ll also want to choose a ‘preset folder’ where your preset is stored. By default it will be stored in a ‘User Presets’ folder, but there is nothing stopping you creating your own and moving the ‘presets’ to a different folder if you change your mind. I use the default folder.
The next and most important step is to choose what settings from your current image adjustments you want to include in your new develop preset. You should go ahead and include all of the changes you have just made. I find it easiest to click ‘Check None’ and then add the ‘individual’ settings I want to include in my new preset like exposure, contrast, vibrance etc.
Metadata
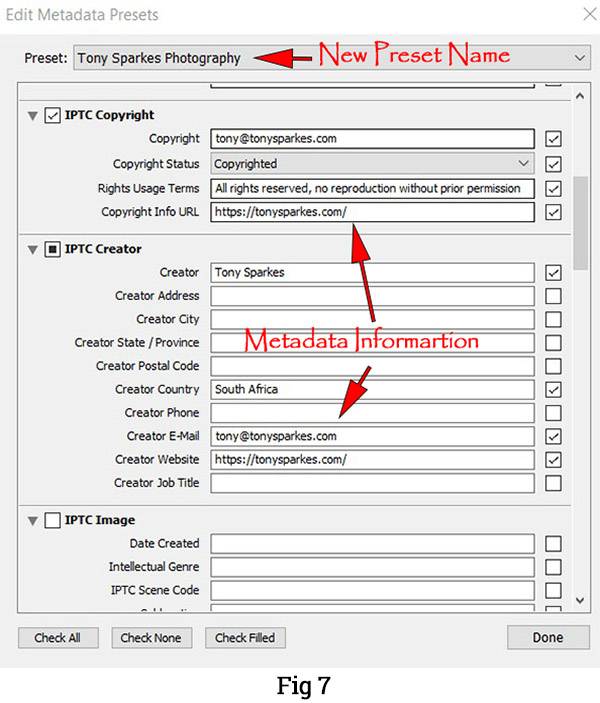
All photoshop Lightroom workflow strategies require Metadata. Metadata is the information behind the image. If you want the information to tell others who the image belongs to, this is the area in which to do it. For copyright, (do not confuse this with a watermark), adding your name and address, website etc., so that there is no mistaking who the image belongs to.
This can be applied during the import, as long as you create a ‘Metadata Preset’ by saving the entered data. Select ‘new’ from the ‘Metadata’ dropdown menu, enter your information as desired and press create when completed. (See Fig 7).
Your created ‘preset’ with your chosen name will appear in the ‘Metadata’ dropdown menu. Choose this preset when you import your images and all the information you applied in your preset will be applied to each image.
Keywords
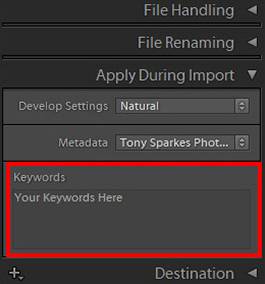
The last field in the ‘Apply During Import’ section is ‘Keywords’. I cannot stress enough the importance of keywords. In the simplest sense, keywords in Lightroom are a way to describe key elements about a photograph.
Keywords are great to be able to locate photos by adding anything, events, shoot location, theme, date, etc., any word really that lets you identify and quickly find your photos, especially when you have a large catalogue. Your keywords in the metadata act as an identifier and will show up in internet searches when people search for certain words and phrases, if you put your photos online or perhaps photo sharing websites like Flickr or 500px.
Future Proof
None of us will know what software will be available to us photographers in the future, or if Lightroom itself will be used as widely as it is now. However, you can be pretty sure that if you ever transfer your images to another image library application, it should recognise your ‘keywords’ as they are added to your photo’s metadata.
In your Lightroom ‘Library’ grid view, photos with keywords display a thumbnail badge. All keywords in the catalogue are viewed in the ‘Keyword List’ panel (in library view). You can also add, edit, rename or delete keywords at any time from the ‘keywording’ section.
In the ‘Apply During Import’, section the ‘keyword’ box is there to let you specify and enter specific keywords for your shoot that you have perhaps not included in a ‘metadata preset’ you created. If there are certain keywords that apply generally to the photographs you are about to import, then put them in the space provided; make sure to include them before import though.
Finally the last word on keywords. A good ‘keyword strategy’ will allow you to find related images more efficiently through the filters in the ‘Library module’ if you need to. Go to Library > ‘find’, and tap in your keyword in the ‘Library filter box’ which appears on the right-hand side and press enter. Those ‘keyworded’ images will appear. With good keywords embedded in the metadata of your images, hours could be saved looking for images in your catalogue that you want to find quickly.
Destination Section
If you followed my ‘creation of sub-folders’ through Lightroom as per Fig 1 & 2 in my ‘File Structure and Location’ sections above, you will see these (your) subfolders have all ‘appeared’ on the right-hand side, below the ‘Destinations’ section under the ‘drive letter’ which you created them under.
This last section identifies the location where our ‘import’ process will finally place and store our image files. The first field you see is called ‘Into Subfolder’, which I always leave un-checked, as I do not want Lightroom to create new subfolders for me here.
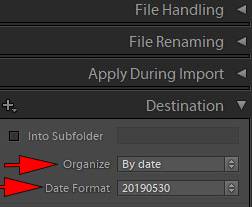
Since we have already created a sub-folder for ‘Shoot Location’ and a sub-folder for each ‘Year’ under that ‘Shoot Location’ and our photo file names will already contain the full date when renamed, I do not feel the need to create sub-folders for the year again. Instead, I like to keep everything simple and organised, instead of having many different sub-folders in the system. Therefore, I always choose ‘Organise By Date’ and not ‘Organize Into one Folder’
As I store all of my images in a master folder called ‘Photographs’ and then sub-folders ‘Wildlife and Nature’ > ‘Shoot Location’ > ‘Year’, from here I simply select the year under the appropriate ‘Shoot location’, as shown above in Fig 8.
Final Import
As you can see in Fig 8 Lightroom is now set to create a set of sub-folders based on the day or days of the shoot (from camera metadata), the number of images
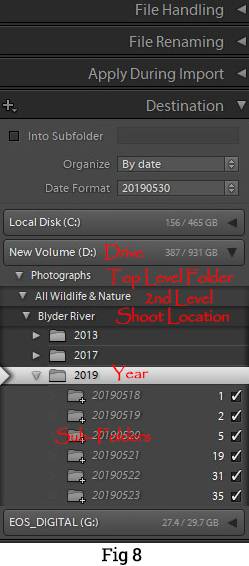
If I pay another visit to Blyde River in 2019, I will choose the same folders (Blyder River\2019) and the system will create sub-folders with a different date based on your shoot day, taken from your photo’s metadata. Using this method assures me I won’t ever run into problems with duplicate file names.
Once you choose your destination folder, simply click the ‘Import’ button to start importing your images. The import window will go away and you will start seeing your images popping up in your Lightroom catalogue (centre area).
Now that you know how to import your images with ‘custom templates’, go ahead and import all of your images into Lightroom Classic CC and make sure that everything gets imported correctly.
Well done, great job importing!!! One last thing to do. Once the ‘Import’ screen has gone and all files are imported and to make sure Lightroom is happy with knowing where all your files and folder are, you need to ‘Synchronise’ your Top Level Folder (i.e. Photographs) and thus by inference all your Sub-Folders & Files below it will be synchronised as well.
Simple go to the left-hand side, right click on your Top Level Folder (i.e. Photographs) and choose ‘Synchronise Folder’; the window ‘Synchronise Folder’ will appear and simply press the button ‘Synchronise’. Lightroom will then ‘Synchronise’ all your folders and files between the various drives and Lightroom, ensuring all is in a correct order and location. This should be undertaken periodically.
Conclusion
Importing your images into Lightroom Classic CC is undoubtedly a little intimidating at first for the novice or first time user of this software. If you follow these easy step by step instructions your Lightroom workflow will improve dramatically, especially when creating your Lightroom catalogue, folder/file structures and applying keywording. Being able to find your images at any time in the future with ease and in an orderly, structured way will be of great benefit to any photographer.
I hope you have enjoyed this Lightroom Workflow tutorial? If yes, then why not bookmark our blog page for the best Lightroom tutorials and Lightroom cc workflow tips.
- African Wildlife Photography Tips - February 23, 2020
- Low Light Wildlife Photography - November 26, 2019
- Bonamanzi Game Reserve - November 21, 2019

